Acrylic nails look stunning, but every set has to come off eventually. Whether you are ready for a fresh style, a nail break, or simply cannot make it to the salon, knowing how to remove acrylic nails correctly at home can save your natural nails from serious damage.
This guide covers every method, every tool, and every aftercare step your nails need. You will not find vague advice here. You will get clear, actionable instructions backed by what nail professionals actually recommend.
TABLE OF CONTENTS
- What Are Acrylic Nails? (And Why Proper Removal Matters)
- Tools and Supplies You Will Need
- Method 1: Acetone Foil Wrap Method (Most Effective)
- Method 2: Acetone Bowl Soak Method
- Method 3: How to Remove Acrylic Nails Without Acetone
- Method 4: How to Remove Acrylic Nails Without Tools (Emergency Method)
- How to Remove Acrylic Nails Without Damage
- What to Do When Acrylic Nails Will Not Come Off
- Aftercare: How to Restore and Strengthen Your Natural Nails
- Common Mistakes to Avoid
- When to See a Professional
- Frequently Asked Questions
What Are Acrylic Nails? (And Why Proper Removal Matters)
Acrylic nails are created by combining a liquid monomer with a powder polymer. When mixed and applied to the nail, this combination hardens into a durable shell that bonds tightly to your natural nail plate.
That strong bond is exactly what makes acrylics so long-lasting, and exactly what makes improper removal so damaging. Ripping, peeling, or prying off acrylics tears away the top layers of your natural nail, leaving it thin, weak, white, and rough. In serious cases, it can even separate the nail from the nail bed, a condition called onycholysis.
The good news: proper removal takes patience, not skill. Follow the correct process and your natural nails stay largely intact.
Important: Never pull, peel, or bite acrylic nails off. This is the single most damaging thing you can do to your natural nails. Always use one of the methods in this guide.
Tools and Supplies You Will Need
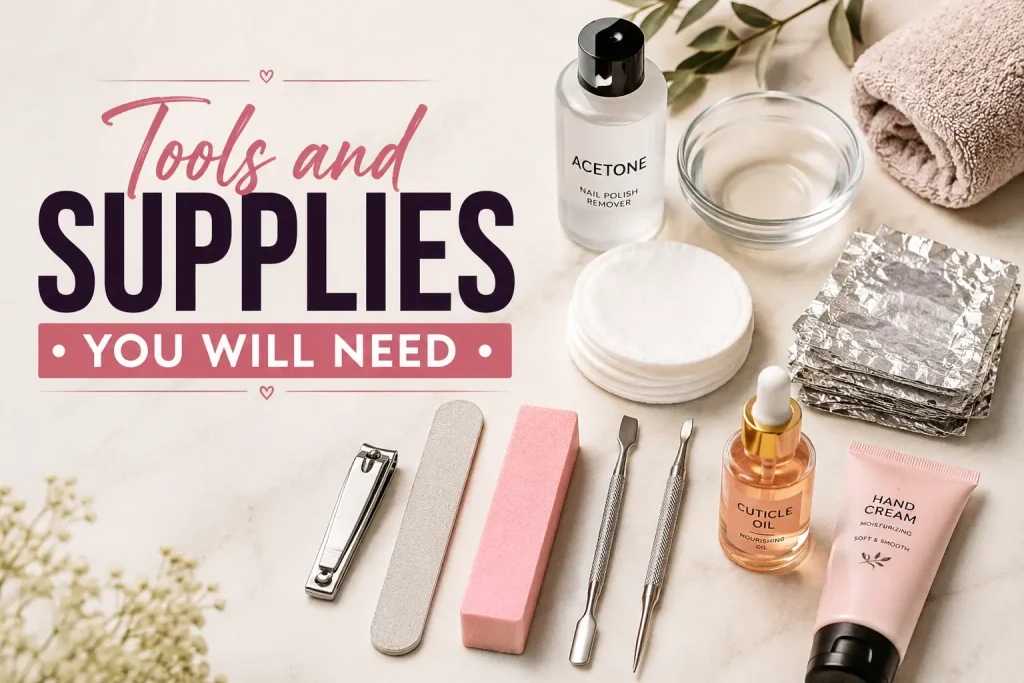
Having everything ready before you start will make the process smoother and safer. Here is what each item does and why it matters:
Essential Supplies
- Nail Polish Remover is not strong enough. Regular nail polish remover contains only 10 to 30% acetone. You need 100% pure acetone to dissolve acrylic effectively. Find it at beauty supply stores, pharmacies, or online.: 100% Pure Acetone
- Trimming the length of the acrylic before soaking reduces the amount of time and acetone needed.: Nail Clippers
- Filing off the shiny topcoat and gel layer allows acetone to penetrate the acrylic directly.: Coarse Nail File (80 to 100 grit)
- Used to hold acetone against the nail surface.: Cotton Balls or Cotton Pads
- Wrapping foil around each finger keeps the acetone-soaked cotton in tight contact with the nail and slows evaporation.: Aluminum Foil (cut into small squares)
- Used to gently push off softened acrylic. Never use a metal cuticle pusher aggressively.: Cuticle Pusher or Orangewood Stick
- Apply around the nail and on the skin before soaking to protect from acetone drying and irritation.: Petroleum Jelly (Vaseline)
- For aftercare, rehydrating the nail and surrounding skin is essential after acetone exposure.: Cuticle Oil or Nourishing Hand Cream
- If using the bowl method, use glass or ceramic. Acetone will dissolve plastic.: Bowl (glass or ceramic)
- To smooth the nail surface after acrylic removal.: Nail Buffer (fine grit)
- Optional but highly recommended for post-removal recovery.: Nail Strengthener
Workspace Setup (Do Not Skip This Step)
Acetone is highly flammable and produces strong fumes. Before you begin:
- Work in a well-ventilated room. Open windows or use a fan.
- Keep acetone away from all open flames, candles, and heat sources.
- Lay down a towel or paper towels to protect your surface.
- Keep children and pets out of the area while working.
Method 1: Acetone Foil Wrap Method (Most Recommended)
This is the most effective, most widely used, and least damaging method for removing acrylic nails at home. Nail professionals use a salon version of this exact technique every day.
Time Required: Approximately 30 to 45 minutes total. This is normal. Do not rush it.
Step 1: Trim Your Acrylic Nails
Use nail clippers to trim your acrylics as short as possible. Clip slowly, in small sections, working from one side to the other. Cutting in one snap can crack the acrylic and stress your natural nail underneath.
The shorter the acrylic, the less time it takes to dissolve.
Step 2: File Off the Top Layer
Use a coarse 80 to 100 grit nail file and buff the entire surface of each acrylic nail. You are not trying to file the nail completely off, just roughen and remove the shiny top layer. This could be a gel topcoat, regular polish, or the glossy surface of the acrylic itself.
You will know you have filed enough when the surface looks dull and matte with no shiny areas remaining. This step is critical because the shiny surface is essentially waterproof and prevents acetone from soaking through.
Step 3: Protect the Skin Around Your Nails
Apply a generous layer of petroleum jelly to the skin surrounding each nail, including the cuticles and the sides of your fingers. This creates a barrier between the acetone and your skin, preventing excessive drying and irritation.
Do not apply petroleum jelly to the nail itself.
Step 4: Soak Cotton and Wrap
Saturate a cotton ball or pad with 100% pure acetone. You want it wet, not dripping. Place the soaked cotton directly on top of the nail and immediately wrap a piece of aluminum foil tightly around the fingertip to hold the cotton in place.
Repeat for all ten fingers. Work one hand at a time so you still have one free hand to wrap the foil.
Step 5: Wait 20 to 30 Minutes
This is the most important and most frequently rushed step. Set a timer for 20 minutes. The acetone needs time to penetrate and soften the acrylic. If you unwrap too early and the acrylic is still hard, simply rewrap and wait another 10 minutes.
Resist the temptation to check every few minutes. Opening the foil lets acetone evaporate and resets the process.
Step 6: Remove the Foil and Gently Push Off the Acrylic
Unwrap one finger at a time. The acrylic should look mushy, gooey, or crumbled. Use the flat edge of an orangewood stick or cuticle pusher to gently slide the softened acrylic toward the tip of your finger.
Use only gentle pressure. If the acrylic feels hard and does not move easily, do not force it. Re-soak for another 5 to 10 minutes.
Step 7: Buff, Shape, and Care
Once all acrylic is removed, use a fine grit buffer to smooth your natural nail surface. Wash your hands thoroughly with soap and water. Apply cuticle oil generously to each nail and massage it in. Follow with hand cream.
Method 2: Acetone Bowl Soak Method
This method works well but exposes more of your skin to acetone and is less efficient at keeping the acetone concentrated on the nail. It is a good option if you do not have foil available.
- Trim your nails and file off the shiny top layer, exactly as described in Method 1 Steps 1 and 2.
- Apply petroleum jelly to all the skin on your hands except the nails themselves.
- Pour 100% pure acetone into a glass or ceramic bowl (not plastic, acetone dissolves plastic).
- Place your fingers in the bowl so only the nails are submerged. Do not soak your entire hand.
- Soak for 15 to 25 minutes, checking every 10 minutes by gently pressing the acrylic with an orangewood stick.
- Once the acrylic feels soft and crumbly, remove your fingers and gently push off the softened material.
- Rinse hands, apply cuticle oil, and moisturize.
Tip: You can place the acetone bowl inside a larger bowl of warm water. The warmth speeds up the softening process. Never heat acetone directly on a stove or microwave. Acetone is extremely flammable.
Method 3: How to Remove Acrylic Nails Without Acetone
If you do not have acetone available, the warm soapy water method is your safest non-chemical option. Be aware that this method takes significantly longer and works best on nails that are already lifting or near the end of their natural lifespan.
Warm Soapy Water Soak
- Fill a bowl with warm (not hot) water and add a few drops of dish soap or gentle hand soap.
- Trim and file your nails as much as possible first.
- Soak your fingers for 30 to 40 minutes. The warm water gradually loosens the bond between the acrylic and your natural nail.
- After soaking, use an orangewood stick to gently test whether the acrylic has begun to lift. If it lifts easily at the edges, continue gently coaxing it off.
- If it resists, soak for another 10 to 15 minutes. Never force it.
Dental Floss Method (Use With Extreme Caution)
This method is sometimes mentioned online but carries a high risk of nail damage. It works only if the acrylic has already significantly lifted on its own. It involves sliding dental floss under the lifted edge and gently working it toward the tip.
Warning: If the acrylic has not already lifted naturally, do not attempt this method. Forcing the floss under bonded acrylic will peel your natural nail along with it. This method should only be a last resort when the acrylic is already separating on its own.
Method 4: How to Remove Acrylic Nails Without Any Tools
This is for genuine emergency situations only, when you have no tools, no acetone, and no access to a salon. It carries a higher risk of nail damage and should be used as a last resort.
- Soak your hands in warm (not hot) water for at least 40 minutes. Adding a few drops of oil (olive oil, baby oil) to the water can help soften the adhesive.
- After soaking, gently try to wiggle each nail from side to side. You are not pulling up, you are very gently loosening.
- If a nail feels completely loose, ease it off. If it feels attached at all, stop and soak longer.
- Never bite, yank, or pry. If the acrylic will not come off with gentle effort, leave it and find acetone as soon as possible.
How to Remove Acrylic Nails Without Causing Damage
This section covers the specific techniques that make the difference between a removal that leaves your nails healthy and one that leaves them thin, peeling, and painful.
Key Principles for Damage-Free Removal
- Never skip the filing step. The topcoat on acrylic nails is designed to be durable and water-resistant. If you skip filing, the acetone will take much longer to work, and many people get impatient and start forcing the acrylic off.
- Patience is the entire technique. 90% of nail damage during at-home removal happens because someone did not wait long enough and started scraping. If your acrylic is not coming off easily, it simply needs more soak time.
- Use the right pressure. When pushing off softened acrylic, the pressure you use should be no more than you would use to press a button on a phone. Light, smooth strokes away from the cuticle toward the tip.
- Work on one nail at a time when pushing off. The acrylic starts to re-harden once the acetone evaporates. Unwrap and work on one finger, then move to the next.
- Do not file your natural nail to remove residue. If there are small spots of acrylic left, re-soak those specific nails rather than filing them away. Buffing the natural nail too aggressively thins it significantly.
What to Do If Acrylic Nails Will Not Come Off
If you have soaked for 30 minutes and the acrylic still feels very hard, try these adjustments before giving up or getting forceful:
- Check whether you used 100% pure acetone. Regular nail polish remover, even acetone-based varieties, is not strong enough.
- Make sure you filed off the full shiny layer before soaking. Even a small patch of unscratched topcoat can significantly slow the process.
- Re-soak with fresh acetone-soaked cotton. The cotton dries out and loses effectiveness. Replace with a freshly saturated piece.
- Warm the acetone slightly by placing the bowl of acetone inside a larger bowl of warm water before soaking. Do not microwave or heat directly.
- If the acrylic still will not budge after two rounds of 20-minute soaking, visit a nail salon. Continuing to force it yourself will damage your nails. At that point, a professional can assess whether there is an underlying issue.
Aftercare: How to Restore and Strengthen Your Natural Nails
After any acrylic removal, your nails will be softer, drier, and more sensitive than usual. This is normal and temporary. Proper aftercare dramatically speeds up recovery.
Immediate Aftercare (Same Day)
- Wash hands thoroughly with mild soap and warm water to remove all acetone residue.
- Apply cuticle oil generously to every nail. Jojoba oil and argan oil are excellent choices. Massage it in for a minute or two.
- Apply a thick hand cream or shea butter-based lotion to both hands and let it absorb fully.
- Do not apply nail polish or any nail product for at least 24 to 48 hours. Your nails need to breathe and re-hydrate.
First Week Aftercare
- Apply cuticle oil morning and night, every day.
- Wear rubber gloves when washing dishes or using cleaning products.
- Keep nails trimmed short. Short nails are much less likely to break or tear while they are in a weakened state.
- Use a nail strengthener or nail hardener. Apply it as a base coat every few days according to the product instructions. Look for formulas containing biotin, keratin, or calcium.
- Eat protein-rich foods and stay hydrated. Nails are made of keratin, a protein. Nutritional deficiencies can slow nail recovery.
Long-Term Nail Recovery
Natural nails grow at approximately 3 to 4 millimeters per month. If your nails were significantly thinned or damaged, it can take 3 to 6 months for the full nail to grow out and be fully restored. Be patient and consistent with your care routine.
Tip: Biotin supplements (Vitamin B7) are widely used to support nail strength and growth. Consult your doctor or pharmacist before starting any new supplement.
Common Mistakes to Avoid When Removing Acrylic Nails
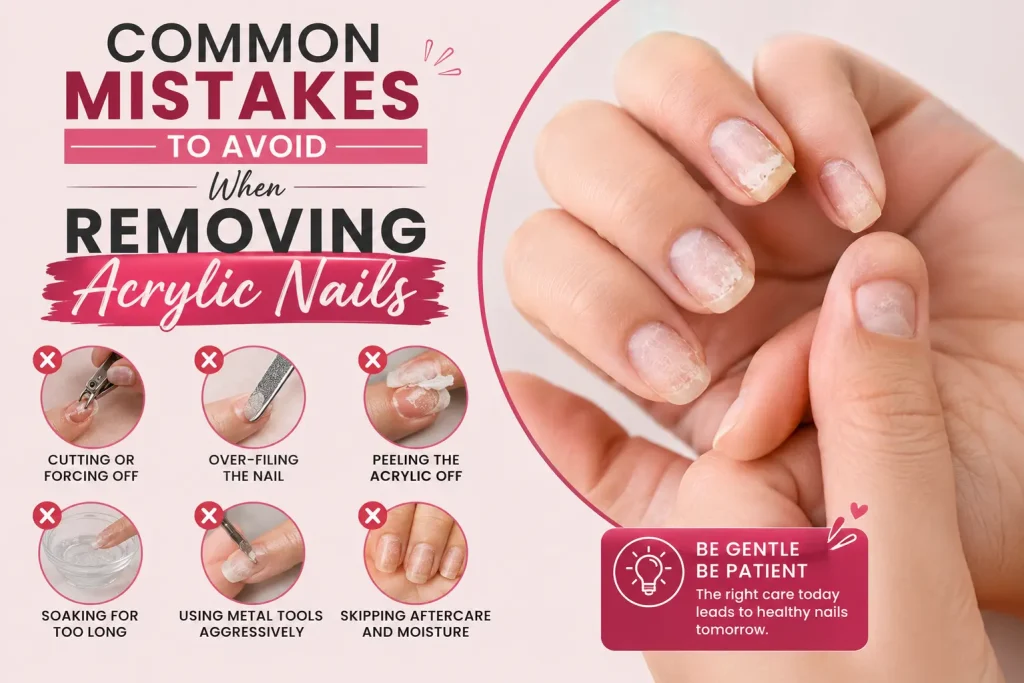
These are the most frequent errors that lead to nail damage during at-home removal:
- Using regular nail polish remover instead of 100% pure acetone. The difference in strength is enormous. Regular remover will take 3 to 4 times longer and still may not dissolve the acrylic completely.
- Skipping the filing step. This one mistake alone can double the time needed and lead to impatience and forced removal.
- Checking progress too often. Every time you unwrap the foil, you lose acetone vapor and slow the process. Set a timer and leave it alone.
- Peeling or pulling the acrylic off when it is partially soft. If it is not fully soft, you will take natural nail layers with it.
- Soaking in acetone with no petroleum jelly protection. Acetone severely dries skin with prolonged contact. Protect your skin before you start.
- Using plastic bowls. Acetone dissolves many plastics and can contaminate the acetone or damage the bowl. Always use glass or ceramic.
- Skipping aftercare. Moisture restoration is not optional. Neglecting it leaves nails brittle and prone to splitting and breaking.
When to See a Nail Professional Instead of Removing at Home
Home removal is perfectly safe in most situations. However, there are specific circumstances when visiting a licensed nail technician is the right choice:
- Your natural nail has separated from the nail bed (you can see a white or yellow gap). This is a potential infection risk and needs professional assessment.
- You notice redness, swelling, or pain around the nail. This could indicate an infection or an allergic reaction.
- You have had a prior allergic reaction to acrylic products. Acetone can further irritate already sensitized skin.
- Your acrylics have been on for longer than 8 weeks without a fill. Extended wear can cause significant lifting and create pockets where bacteria and moisture collect.
- You simply feel uncertain. There is no shame in going to a professional. That is what they are trained for, and the cost of a professional removal is far less than treating nail damage.
QUICK REFERENCE: COMPARISON OF REMOVAL METHODS
| Method | Time | Effectiveness | Skin Safety | Recommended |
| Foil Wrap (Acetone) | 30-45 min | Excellent | High (with petroleum jelly) | Yes |
| Bowl Soak (Acetone) | 20-30 min | Very Good | Moderate | Yes |
| Warm Soapy Water | 40-60 min | Fair (for lifting nails) | Very High | If no acetone |
| No Tools (Emergency) | 40-60 min | Poor | Very High | Last resort only |
Frequently Asked Questions
How long does it take to remove acrylic nails at home?
The foil method takes approximately 30 to 45 minutes from start to finish, including prep time. The bowl soak method takes a similar amount of time. The warm soapy water method without acetone takes 40 to 60 minutes or more.
Can I remove acrylic nails at home without acetone?
Yes. The warm soapy water method works, though it takes longer and is best suited for nails that are already lifting. For bonded, intact acrylics, acetone is significantly more effective and causes less mechanical trauma to the nail.
Will my natural nails be damaged after removing acrylics?
Some temporary softness, dryness, or minor surface roughness is normal and to be expected, especially after longer-term wear. Significant damage, such as peeling layers or severe thinning, is a sign that the acrylic was removed too forcefully rather than allowed to dissolve completely. With proper aftercare, nails typically recover within 4 to 8 weeks.
How do I remove acrylic nails without filing?
Technically possible, but not recommended. Without filing off the topcoat, the acetone must penetrate through a hard, semi-waterproof surface. This requires significantly more time and often still leaves residue. Filing is a 5-minute step that saves significant time and reduces the risk of damage from impatient early removal.
Is it safe to soak nails in acetone?
Yes, when done correctly and for the appropriate duration. Protect your surrounding skin with petroleum jelly, ensure good ventilation, keep acetone away from heat sources, and moisturize thoroughly afterward. People with sensitive skin or those prone to contact dermatitis should take extra precautions.
How often can I safely wear and remove acrylic nails?
Most nail professionals recommend taking a break of at least 2 to 4 weeks between acrylic sets to allow your natural nails to recover strength and moisture. Continuous wear and removal without breaks can lead to progressively thinner nails over time.
What happens if I leave acrylic nails on too long?
Acrylics worn beyond the recommended 2 to 3 week fill interval begin to lift at the edges. These lifted areas create small gaps where moisture, bacteria, and debris can become trapped, potentially leading to nail infections (green nail syndrome) and the breakdown of the natural nail. Do not leave acrylics on for more than 8 weeks without a professional evaluation.
Can I soak off gel nails with the same method?
Yes. The acetone foil wrap method works for both standard acrylic nails and gel nails. Gel nails may take slightly less time to dissolve, typically 15 to 20 minutes compared to 20 to 30 minutes for acrylics. The filing and aftercare steps remain the same.
Final Thoughts
Knowing how to remove acrylic nails at home correctly is one of the most useful things you can learn if you regularly wear acrylics. The difference between a safe removal and a damaging one comes down to two things: the right tools and enough patience.
Use 100% pure acetone, file off the topcoat, protect your skin, and give the acetone the full 20 to 30 minutes it needs. Then moisturize thoroughly and give your natural nails the care they deserve before your next set.
Your natural nails are the foundation of every manicure you will ever have. Treat them well.
You May Also Like It:
Baylor Bears Mens Basketball vs Duke Blue Devils Mens Basketball Match Player Stats